How to Connect Tableau to TIBCO ComputeDB
Download and install TIBCO ComputeDB Enterprise edition to connect Tableau to TIBCO ComputeDB. You can connect Tableau using one of the following options:
- Thrift Server compatible with Apache HiveServer2 (HS2)
- TIBCO ComputeDB ODBC driver
Connect Tableau using Thrift Server
Use the following steps to connect Tableau to TIBCO ComputeDB using Thrift Server that is compatible with Apache HiveServer2. This is also fully compatible with Spark's Thrift.
- Check the system requirements, download and install TIBCO ComputeDB, and then start the TIBCO ComputeDB cluster. Thrift server is enabled by default.
- Download and install Tableau Desktop v2018.3.x from the Tableau Download page. You may also need to register your product.
- Open the Tableau Desktop application, on the left panel, from the To A Server section, select Spark SQL connector option.
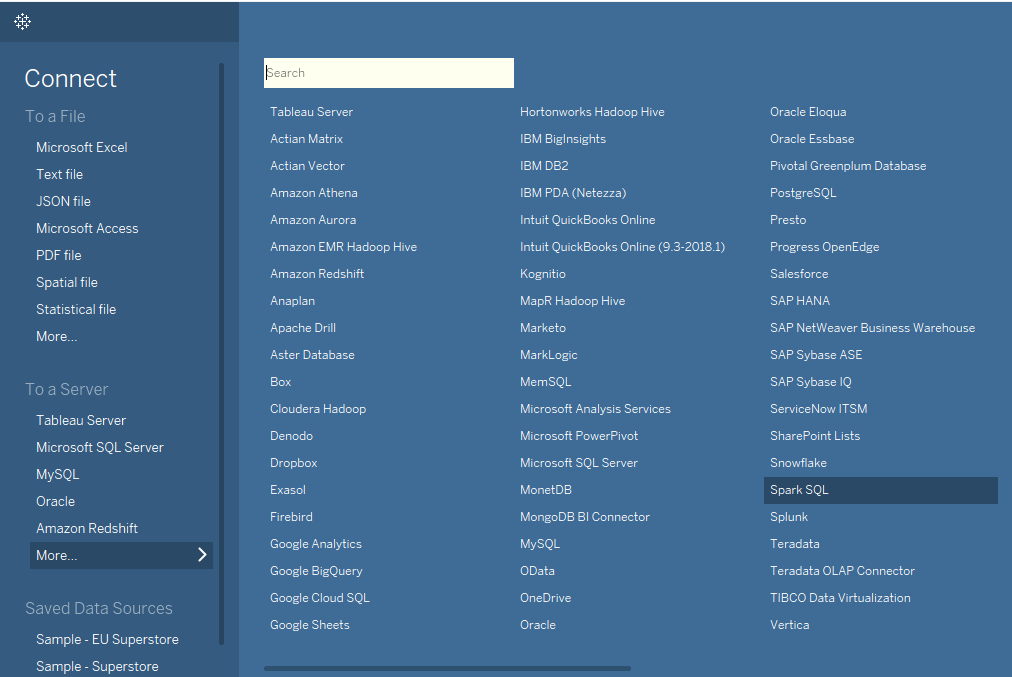
-
In the Spark SQL configuration dialog box, enter the following details:
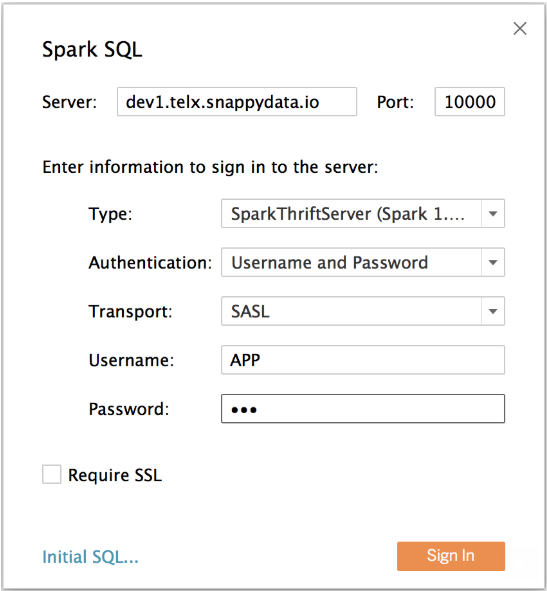
- Enter the host/IP of the Lead node in TIBCO ComputeDB cluster. The default port used by the Hive thrift server is 10000.
- Select SparkThriftServer option from Type dropdown.
- Select username and password option from the Authentication dropdown.
- Set Transport field to SASL.
- Provide a username/password. You could choose to use APP/APP for username/password if authentication was not configured in the cluster.
Note
For more information about Spark SQL configurations, click here.
-
Click the Sign In button to connect to TIBCO ComputeDB. Tableau displays the page where you can browse and select Schema and Tables as per your requirements to create data visualizations.
Note
If you have not installed the Simba Spark ODBC Driver on your system already, the Sign In button is disabled. To enable it, click the Download and Install the drivers link and install the Simba Spark ODBC Driver. After this, the Sign in button is enabled.
Handling Large Size Tableau Extracts in TIBCO ComputeDB
When you are using the Tableau extract feature and if your extracted data set will be large, you may need to do the following:
- Set the max result size allowed by TIBCO ComputeDB By default, TIBCO ComputeDB will terminate a query whose result exceeds 1GB. You can set the spark.driver.MaxResultSize property on the Lead node and bounce your cluster.
- Configure streaming of the result set to Tableau from TIBCO ComputeDB Hive serverTableau permits Initial SQL to be sent to the server when creating a data source connection as described here.
In the Initial SQL dialog box, type the following:
set spark.sql.thriftServer.incrementalCollect=true
Connect Tableau using TIBCO ComputeDB ODBC Driver
Get the latest version of TIBCO ComputeDB and TIBCO ComputeDB ODBC driver from TIBCO ComputeDB Release page.
Use the following instructions to connect Tableau using TIBCO ComputeDB ODBC driver:
Step 1: Setup TIBCO ComputeDB ODBC Driver
Follow the instructions provided here to setup TIBCO ComputeDB ODBC Driver.
Step 2: Install Tableau Desktop (10.1 or Higher)
To install Tableau desktop:
-
Depending on your Windows installation, download the 32-bit or 64-bit version of the installer.
-
Follow the steps to complete the installation and ensure that you register and activate your product.
Step 3: Connect Tableau Desktop to TIBCO ComputeDB Server
When using Tableau with the TIBCO ComputeDB ODBC Driver for the first time, you must add the odbc-snappydata.tdc file that is available in the downloaded TIB_compute-odbc_1.2.0_win.zip.
To connect the Tableau Desktop to the TIBCO ComputeDB Server:
-
Copy the odbc-snappydata.tdc file to the <User_Home_Path>/Documents/My Tableau Repository/Datasources directory.
-
Open the Tableau Desktop application.
-
On the Start Page,
a. Under Connect > To a Server, click Other Databases (ODBC). The Other Databases (ODBC) window is displayed.
b. In the DSN drop-down list, select the name that you provided for your TIBCO ComputeDB ODBC connection (for example snappydsn), and then click Connect.
-
When the connection to the TIBCO ComputeDB server is established, the Sign In option is enabled. Click Sign In to log into Tableau.
-
From the Schema drop-down list, select a schema. For example, app. All tables from the selected schema are listed.
-
Select the required table(s) and drag it to the canvas. A view generated using the selected tables is displayed. If you make changes to the table, click Update Now to refresh and view your changes.
-
In the Worksheets tab, click sheet to start the analysis.
-
On this screen, you can click and drag a field from the Dimensions area to Rows or Columns. Refer to the Tableau documentation for more information on data visualization.